Food Forest Programs we’re learning from and partnering with:
- Great Falls Apple Corps
- Edible Brattleboro
- Resilient Hartford
- Randolph Community Orchard
- Food Forest at the Center for Transformational Practice
- Strafford Edible Pocket Park : 238 Rte 132 in South Strafford. This is a public park inspired by Apple Corps and created by Barbara and Wally Smith.
- Mascoma River Greenway
- 350Vermont ReWild Vermont Project Toolkit
- Regeneration Corps
- Change the World Kids
- Clifford Park Food Forest
Planning and Planting a Guild
By Karen Ganey
Materials:
- Tree
- Shovels
- Tarp
- Compost and/or amendments
- Water
Steps:
DIG – Dig a hole that is twice as big as the root ball and 8” deeper than the depth of the root ball. It helps to remove the sod around the area first. Lay out your tarp right next to where you will be digging. Make a pile with the sod in one corner. As you dig, place your pile in the other corner. Dig around to make a circle approximately 1.5ft from where the trunk of the tree will be planted. Lay the sod root side up in the bottom of the hole. (The organic matter will decompose and eventually provide food for the tree. – No waste J) You can also add compost at this time, but it may only be necessary if the soil is poor. Otherwise, have your compost ready for “top dressing” by covering ~ 1 -3 ft diameter around the base of the tree (2 in. thick) with compost after the tree has been planting. This allows the nutrients to feed the tree while being watered.
PLANT – Presoak the tree and water the hole. Gently remove the tree from the pot. Investigate the roots. Depending on how long it has been potted, you may need to tease or cut apart the root ball. Loosen the soil around the roots and help them to span out in all directions. Place the tree in the hole and help it get settled into the hole by orienting it upright and level with the ground. Then add the soil from the hole back into the hole and fill in around the roots of the trees by gently tamping it down. Water as you go! Keep filling, tamping and watering until the soil is at the base of the tree. This area is not always clear, but most fruit trees have a crown that is a bulbous part of the stem. You don’t want to cover this with soil.
WATER – Water is necessary for a tree’s roots to develop and absorb nutrients from the soil. Upon establishment, a new fruit tree will need 10 gallons of water/day depending on temperatures, rainfall and wind. If the leaves appear wilty, then apply water at a slower drip for a longer duration of time. The evening is the best time to water, giving the tree enough time to absorb the water before the heat of the day.
Establishing a Plant Community – Guild and polycultures!
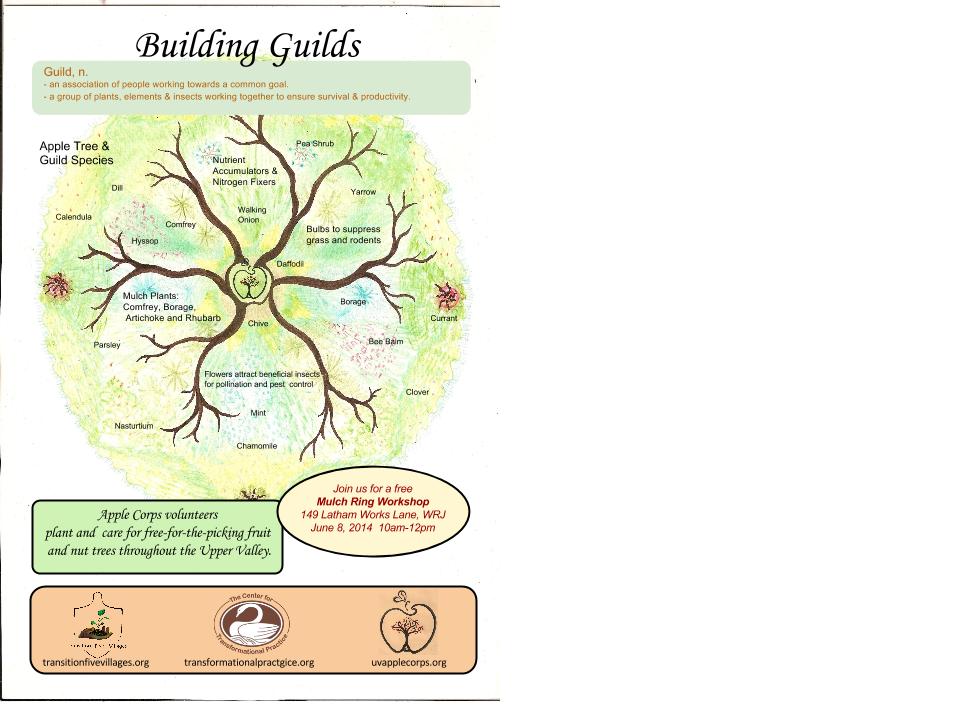
What is a Guild?
- An association of people working towards a common goal
- A group of plants, elements, & insects working together to ensure survival & productivity
Groupings of specific plants around the mulch ring of the tree enhance the health of the tree by doing a number of different functions for the tree and the community at large. Planting guilds around your fruit or nut tree is best done in the early years of the trees growth, before it’s surface roots take over. Choose from the many species to enlighten the colors, smells, tastes, and textures for the enjoyment of the pollinators, soil dwellers and gardener alike.
Considerations for your guild could include
Dynamic Accumulators: bring sub surface minerals to plants with shallow roots
Comfrey, horseradish, borage, chamomile, chives, lemon balm, peppermint, salad burnet
Flowers for cutting, drying, color & tea:
Anise hyssop, calendula, borage, bee balm, zinnia, straw flowers, status
Beneficial’s for Insects:
Allysum, alfalfa, anise hyssop, buckwheat, clover, dill, fennel, feverfew, lemon balm, lobelia, nasturtium, parsley, spearmint, yarrow
Medicine and Tea:
Artemisia, echinacea,chamomile, lavender, lemon balm, mallow, yarrow,
Nitrogen fixers:
Clover, columbine, lupine, alfalfa, fava beans, Siberian pea shrub
Edible ground covers and vines:
Groundnuts, Jerusalem artichokes, strawberries, sorrel, squash
*References:
The Pruning Book; Lee Reich
The Holistic Orchardist, Michael Phillips
Gaias’s Garden, Toby Hemenway
Guide to Spring Care
By Karen Ganey
A Vermont winter can be harsh on young fruit trees. They have to store enough energy to withstand freezing temperatures, piling snow on brittle branches, hungry voles and munching deer. The early spring is a great time to inspect the trees for any broken or eaten branches, do a bit of raking and weeding around the base to inspect the bark and trim for optimum shape and health. Here is a list of considerations when inspecting your trees.
Pruning
Trim just above a growth bud being careful to make a clean cut. Sharp pruners are a must for you and the tree. Late winter or early spring is the best time to prune because the trees are dormant, thus will respond more positively to the cuts. Do not prune during times of rain. You can follow these guidelines when pruning, but best to refer to pruning guides for full spectrum of information from proper tools, to different types of cuts. *
Always cut to a growing bud tip, so as to not leave any long stems.
Best to have 4-6 “ between branches at 45-90 degree angle.
Best to trim all branches 24”above the soil.
Disease
As the snow melts, the leaves of the previous season that have fallen and not decomposed yet are likely hosting spores of the apple scab. The leaves provide a perfect haven for the spores to colonize and cause the fruit to be bad. The best way to prevent scab and other diseases is increase biological groupings of fungus and bacteria to build healthy soil immunity. You can do this with biological sprays of efficient microbes made up of a diverse mix of bacteria and yeasts (lacid acid bacteria – suppresses disease and photosynthetic bacteria – take nutrients from the air). You can make these mixes with molasses and culture. For more information go to HYPERLINK “http://www.groworganicapples.com” http://www.groworganicapples.com or Michael Phillips refere to the Holistic Orchardist, by Michael Phillips.
You can also rake the leaves and add them to a hot compost pile until you can spray.
Mulch
Keeping the perimeter of area from a 3ft – 5ft around the tree weed free allows the tree to absorb more nutrients from the soil surface and depths. You can add compost and mulch to suppress weeds or you can cultivate these areas as gardens to include plants that are companions to each other and good for us in the form of salad, teas, and medicines. These combinations make up guilds, that are groupings of species serving many functions for both the mini ecosystem around a fruit tree, including bees and pollinators, hummingbirds, and butterfly’s.
*References:
The Pruning Book; Lee Reich
The Holistic Orchardist, Michael Phillips
Gaias’s Garden, Toby Hemenway
Organic Pest Control Podcast by Michael Phillips
In this episode we are joined by Michael Phillips. Michael is an apple farmer, consultant, and writer. He has written several books, and is most well known for his book “The Apple Grower: A guide for the Organic Orchardist.”
Pruning Resources
FROM THETFORD ELEMENTARY SCHOOL PRUNING WORKSHOP WEDNESDAY MARCH 6, 2013
Basic pruning resources:
Fedco Trees (also illustrations in catalog):
Advanced pruning resources:
“The Pruning Book” Lee Reich, Taunton Press, 2010.
Pruning old abandoned/neglected trees
Pruning Fruit Trees
By Karen Ganey
I was delighted to learn of the topic of this month’s newsletter, ‘Shaping the Future by Looking Forward and Backward’. This is the perfect metaphor for pruning fruit trees, a task that requires a bit of historical perspective as well as a vision for the future. What we learn from the past helps us build our vision and access our goals and hopes for our fruit trees. This relates to pruning fruit trees because we are able to see the effects of the previous year’s pruning and make adjustments to our shaping as needed. It is also no coincidence that the time for pruning is during the winter months (Between Feb and March), when the tree is in its dormancy. Pruning fruit trees can be extremely rewarding, but it takes intention, courage, risk taking, faith, observation, and a bit of skill. However, before I cover some of the techniques, first let’s explore what pruning is.
Pruning at its basic level is a technique for trimming off any dead, diseased, or damaged limbs and branches. This helps the tree maintain strength and vigor while encouraging an over all shape that will support future growth, especially in the form of flowers and thus fruit. A common problem with old fruit trees is that water shoots and branches don’t get pruned thus shading the inner branches of the trees. Blossoms need both light and air flow, so after a few years of neglect the fruit production will drop. By trimming out dead limbs that are not providing leaves for the tree to absorb food by way of sunlight, it helps to open the inside of the tree to more light, thus encouraging more fruit. On a more esoteric level, pruning is a way to develop a relationship with your tree. That’s right! Building a relationship with your gardens and especially fruit trees is a good way to ensure that you are both thriving. You take a risk. You make a choice. It responds. You assess and reassess depending on fruit production and over all health and vigor. The process can be organic and regenerative for both the tree and the pruner.
In preparation for pruning, you might stand back and observe the tree you are about to trim. Every tree has a unique composition that is good to recognize. I like to spend a few minutes looking at the over all structure of the tree and imagining what cuts I will make first. Here is a list to guide your observations.
- Shape: Peach trees like an open center or bowl shape while apples and other stone fruits prefer a central leader. What is a central leader? When there is one prominent upright leader or trunk that all other branches will stem from. Perhaps it is developing two strong leaders that look promising for a future of fruit. Are there any water shoots or other branches that are growing towards the inside of the tree?
- Branches: In general, you want to cut out any branches that growing inwards towards the center because these will just end up shading the inner parts of the trees. Also, if the tree is still young (less than 5 years old), you will want to make sure that any branch bearing fruit is strong enough to hold the fruit. If not, you will have to pick un-ripened fruit if it is bending the branch too much. You will also notice that there is a natural “scaffold whorl” pattern in which the branches spiral up the tree, around the trunk. The space between the branches should be no less than 6 in.
- Angel: The angle of the branches is important for light and air -flow as well as to maximize fruit production. The optimal angel of the where the branch meets the trunk is between 45 and 60 degrees. Anything too vertical or too wide will be at risk of breaking from weight of snow or fruit.
The important thing to remember is to not get daunted by the task and many details of pruning. Next month, I will cover different types of cuts, ie. Heading cuts (pruning approximately 1/3 of a branch at a bud, to encourage vigor) and thinning cuts (cutting an entire branch where it meets the trunk to bring in more light and air). I will also discuss the proper angel and technique to pruning with both saws and loppers. Until then, happy planning!
Sources:
- North Carolina Extension Ageny http://www.ces.ncsu.edu
- The Pruning Book, Lee Reich, The Taunton Press, 2010
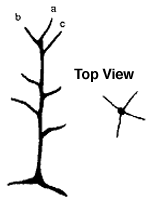
Figure 1. Pruning a central leader tree
As the buds begin to swell, head the tree at 30 to 34 inches above the soil surface.
First-Year Summer Pruning
Summer prune when new growth is 3 to 4 inches long. Leave a as the new leader, and remove b and c. Select four uniformly spaced laterals for the first scaffold whorl, and remove the remaining lateral branches.
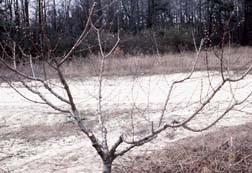
Dormant pruning a mature open-center peach tree
Photo credit: North Carolina Extension Agency
Apple Borer
From FEDCO Catalog 2014
What to Keep an Eye Out for?
Beware of the Apple Borer!
In many parts of central and northern New England the roundheaded apple- tree borer (Saperda candida) is the number one enemy of young apple, crabapple and quince trees. If you are growing young apple trees in these locations, you must protect your trees from this pest. Farther south and north the borer may not be a pest. If you don’t know if they are a problem in your area, check with any grower near you: they’ll know. Otherwise, err on the side of caution. The borer does not endanger other fruit trees or ornamentals.
The borer beetle lays its eggs under the bark near the base of the tree. The developing larvae tunnel through the wood, eventually weakening the tree until it crumbles and falls over. The trouble sign is small deposits of orange sawdust, called frass, at the base of the tree, usually appearing in June or July. Left unchecked, borers usually mean death for your trees.
Borers thrive in shady moist warm environments. Keep grass back at least 6″ from the tree base. Activity is most prevalent in June and July. Keep a lookout for the frass. Locate the hole or soft spot in the trunk and insert a wire until you locate and kill the larvae. Cut away soft, spongy pockets with a knife. Even serious carving is less harmful to the tree than leaving the larvae alive inside.
After years of experimentation, I think that painting is the best deterrent. I’ve tried a number of recipes and this is my favorite. It’s easy and requires no hard-to-find ingredients. Mix white interior latex paint with joint compound. (The stuff you smear on sheet rock joints and nail holes—you can buy a small tub at any hardware store. Some exterior paint formulations contain ingredients that can harm the underlying phloem.) The consistency should be thick but still quite easy to paint, not glob.
Repaint periodically or each year as needed. This mix will help deter borers. It will also make for easy detection of any infestation you may have. Look for the frass! Using the paint method, you will also need to put some sort of screen or plastic rodent protector around the trunk during the winter months.
We are experimenting with a borer-protection formula using more benign ingredients. It doesn’t last or adhere as well as the paint-joint compound mixture, but it appears to work fairly well.
- 2 qt quick lime
- 4 gal milk
- 1 gal boiled linseed oil
Mix well. Thicken as needed with clay or Surround (available in the Organic Growers Supply section of the Fedco Seeds catalog). Apply with a paint brush. Reapply as needed.
For many years I used a homemade “screen saver” wrapped around the young trees to deter borers. No more. I’ve given up and switched to the paint method. I recommend you do too.
Site Assessment
The Successful Planting Initiative: Conducting a Site Assessment
By Rick W. Harper
It wasn’t so long ago that we heard from the foremost climate authority (Punxsutawney Phil) that spring is but around the corner. And with increasing daylight hours, this promise seems to becoming evermore true. With the warming temperatures, we tree enthusiasts look forward to breaking ground on some new site on our property or in our community where we can establish (yet) another tree (or population of trees). Whether it is our enthusiasm taking over, or in some cases a lack of awareness, we sometimes forget, however, that many future problems related to any urban planting can often be averted with a simple plan. And that is what a site assessment is: the first step in properly planning a planting initiative.
To start, we need to determine what our objectives are from the planting initiative. Though summed up rather succinctly in that statement, anytime a group of individuals gather to talk about an initiative, there can undoubtedly be differing goals and opinions about how to achieve them. Do we want trees that are attractive because of their flowering habit or bark coloration? How large do we expect these trees to become? Do we want low-maintenance trees that require little water, pruning, and pest management? What about fruit – would this trait be attractive or perhaps a nuisance (says the owner of a mulberry tree (Morus spp.) after they’ve tracked the delicious dark-colored, juicy fruit into their house)?
After we’ve sorted out what we want in terms of tree “performance” the real work begins regarding understanding the many factors that we must consider relative to site conditions – here are just a few:
Climate Compatibility: There are many sources that we can examine to better identify what the specific climatic conditions are in our communities or landscapes. The Sunset Garden Calendar and USDA Plant Hardiness Zone Map are two commonly accepted guides to determine the climatic conditions on a site set aside for planting.
Light Levels: There of course are varying degrees of understanding light levels on a given location, but we often define a site that features ‘full sun’ as experiencing six hours or more of direct sun, while a site that features ‘partial sun’ as experiencing less than six hours of direct sunlight. A site that experiences no direct sunlight is classified as ‘shady.’
Temperature Variations: The very nature of the urban environment dictates variety and its effect on growing conditions is no exception: Are there nearby structures that reflect heat, or affect wind patterns? Are there nearby bodies of water that help to moderate temperatures?
Soil Compaction: Since soil compaction and usable soil space is considered by many sources to be the key impediment to urban tree health and longevity, the examination of this environment can often play a large role in determining the success (or failure) of a planting initiative. The use of a simple tool known as a penetrometer can help us to understand if the roots of a newly planted tree will be able to penetrate the soil in the site, or if other measures (i.e. soil amending or the installation of other more engineered options like a structural soil or suspended pavement) are needed to enhance rooting space.
Soil Conditions: Other important soil considerations must also be factored into the equation including Drainage, pH, Texture, and Disturbance (i.e. soil layering or contamination). Though understanding all of these factors in relation to the future health and performance of a new planting is extremely important, most of these variables can be better understood through simple (and often quick) field testing.
Spatial Constraints: Many above-ground spatial considerations must be considered, including distance from the planting site to nearby buildings, other trees, and, of course, utility lines. Additionally, many below-ground spatial considerations can impact the health of new urban trees, including underground utilities, usable soil volume limitations (as previously mentioned), contaminated soil, or buried debris.
Other Considerations: Though this list is a good start, it is hardy comprehensive as there are many other factors that may still warrant further consideration: Is the planting site exposed to road salt? Are other environmental issues present in this location, such as flooding or soil erosion? What are other nearby plants (i.e. ‘indicator species’ ) telling us about the site? The presence of clover for example, (Trifolium spp.) may indicate poor fertility while the presence of bentgrass (Agrostis spp.) may indicate excessive moisture.
After spending time understanding these various factors, it is prudent to return to the initial stage – figuring out the objectives desired from the planting initiative in question. From there we move to what many consider the most fun of all: the plant selection phase!
This setback planting may be growing in a more conducive soil environment as this site already fosters more attractive plant cover (i.e. healthy turfgrass).
Current indicator species on this site (i.e. crabgrass) may indicate rather inhospitable conditions such as excessive compaction or dryness.
(This article is the first in a series about successful planting in the urban environment; the next installation will discuss ‘proper tree selection’ ).
Rick W. Harper, serves as Extension Assistant Professor of Urban & Community Forestry, UMass Department of Environmental Conservation, Amherst, and is also an ISA Board-Certified Master Arborist.
Tree Resources:
Links to information about tree choices that are right for the Upper Valley, care of trees, etc.
- Cheshire Co NH Extension Service (CCES): Type of fruit trees recommended in NH
- About Dwarf Root Stocks
- Varieties CCES (NH) lists and what type of eating they are good for and when they ripen
- Which varieties of which fruit trees grow where and planting and care instructions
- Fertilizing fruit trees
- Pollinating fruit crops
- Training and pruning
- Companion Planting
